Creación de un programa de escritorio para datos LIDAR
Creating a desktop program for LIDAR data
Después de realizar varios programas con la temática LIDAR, hemos empezado a crear el programa definitivo. Para ello hemos empezado a modular el programa. Hemos dividido el problema en varios problemas diferentes. La resolución de cada problema es un módulo distinto.
Soluciones a buscar:
1ª Lectura de archivos LIDAR en su formato .las
2ª Visualización de la planta y diálogo con ella. Debemos poder colocar escalado un resumen de la planta y además poder extraer coordenadas de este objeto.
3ª Visualización de las proyecciones y/o 3D. Extracción de datos de ésta.
La lectura de archivos LIDAR se hace siguiendo las instrucciones de las especificaciones publicadas en http://www.asprs.org/a/society/committees/lidar/LAS_1-4_R6.pdf.
Es complejo, pero no imposible. Hemos utilizado para nuestro proyecto Visual Basic 6 por varios motivos. Somos poseedores de una licencia, se conecta muy bien en güindous y cierra el programa. Cada módulo será un archivo .ocx que se incorpora fácilmente en programas más grandes.
After making several programs with the theme LIDAR, we started to create the final program. So we've begun to modulate the program. We have divided the problem in several different problems. The resolution of each problem is a different module.
Solutions to search:
1st Reading LIDAR file format. .las
Display 2nd floor and dialogue with it. We climbed to place a summary of the ground and also to extract coordinates of this object.
Viewing 3rd projections and / or 3D. Extracting data from it.
LIDAR File reading is done following the instructions of the published specifications http://www.asprs.org/a/society/committees/lidar/LAS_1-4_R6.pdf.
It's complicated, but not impossible. We have used for our project Visual Basic 6 for several reasons. We are holders of a license, it connects fine in "Güindous" and closes the program. Each module is a file. OCX that is readily incorporated into larger programs.
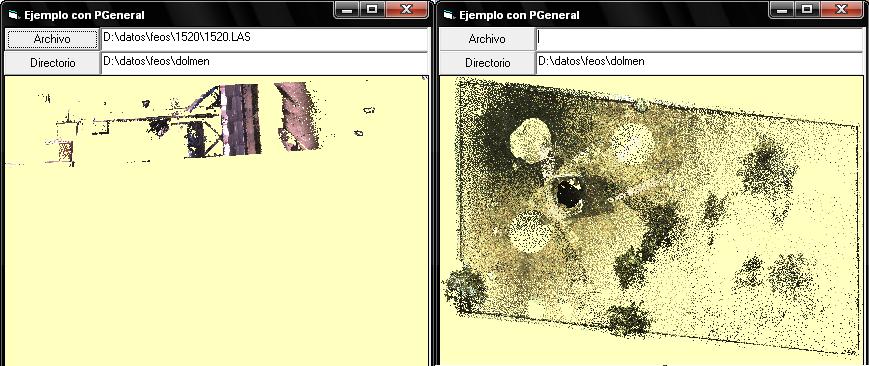
El primer módulo, P_LIDAR.ocx. Visualizando la Planta General.
The first module, P_LIDAR.ocx. Viewing General Plant.
El aspecto externo es este:
The external appearance is this:
The external appearance is this:
Con las funciones y subrutinas siguientes:
With the following functions and subroutines:
Sub DameDir(Directorio) → Lee y pinta todos los archivos las de un directorio completo.
Sub DameArchivo(Archivo) → Lee y pinta un Archivo
Sub ColorFondo(Color) → asigna un color de fondo. Por defecto es amarillo pálido.
La nueva versión la subiremos en breve
.... Continuará
Funciones Val_x(), Val_y()
→ Nos devenven los valores donde se pinchara por última vez en el objeto.
Funciones Max_x(), Max_y(), Max_z(), Min_x(), Min_y(), Min_z()
→ devuelven los valores máximos y mínimos de contorno.
Función MaxN(NumMax)
→ asigna el maimo valor de puntos representados. Por defecto este número es de 20.000.
Con el evento siguiente:
DondePincha (Boton, Mayus, X, Y, UTMx, UTMy) → Al hacer click en el objeto tendremos acceso a conocer que botón fue pinchado, si lo fue con las mayúsculas y la posición relativa (x,y) o absoluta (UTMx, UTMy). Esto último nos permitirá vincularlo a otros objetos.
Sub DameDir (Directory) → Lee and paint all .las files in an entire directory.
Sub DameArchivo (Archive) → Lee and paints a File
Sub backgroundColor (Color) → assigns a background color. Default is pale yellow.
Val_x functions () Val_y ()
→ We return the values which punctured last in the object.
Max_X Functions (), y_max (), max_z (), x_min (), y_min (), MIN_Z ()
→ return the maximum and minimum values of contour.
MaxN Function (maxnum)
→ maimo assigned point value represented. By default this number is 20,000.
With the next event:
DondePincha (Button, Shift, X, Y, utmx, UTMY) → By clicking on the object will have access to know which button was tapped, if it was with .las case and the relative position (x, y) or absolute (utmx, UTMY). The latter will allow us to link it to other objects.
Mi amigo Miguel E. me pidió que modificara el código para que el Norte estuviera siempre arriba (perdón por el error) y que además no parara de leer un archivo al sobrepasar los 2GB. El problema del segundo caso es la utilización por el entorno directo de programación de Windows que limita en el valor del entero máximo (tipo Long) como Int32. Es decir 2³¹ = 2.1471483.648 = 2GB. Al cambiar el sistema a la lectura utilizando las dlls directas del kernel es posible es utilizar el siguiente tipo de entero Int64 que eleva al utimo byte leible a 2⁶³ = 183446.7442073.7091551.616. Siguiendo los sufigos disponibles 181446.744TB ó 18.446PB (petabyte) ó 18EB (exabyte). Si tiene curiosidad por saber cómo se hace contacte con nosotros.
Si bien algunos archivos LIDAR sobrepasan los 2 GB no se nos van a dar casos tan exagerados. Por tanto la solución cierra el problemas del tamaño.
My friend Miguel E. asked me to modify the code so that the North was always up (sorry for the error) and also do not stop to read a file to exceed 2GB. The second problem is the use case for the direct environment of Windows programming that limits the maximum integer value (type Long) as Int32. That is 2 ³ ¹ = 2.1471483.648 = 2GB. By changing the reading system using kernel direct dlls is possible is to use the following integer type Int64 that elevates the latter one byte readable to 2 ⁶ ³ = 183446.7442073.7091551.616. Following the sufigos available 181446.744TB or 18.446PB (petabyte) or 18EB (exabyte). If you're curious about how to make contact with us.
While some LIDAR files exceed 2GB not going to give us so exaggerated cases. The solution thus closes the size problems.
El nuevo módulo OCX para LIDAR contiene las siguientes propiedades y métodos
.SeaDir "Diectorio de lectura" Sólo establece el directorio de trabajo. Serán leídos todos los archivos .las contenidos
.CentroX_ = valor de la coordenada X. Establece en centro de visualización del archivo
.CentroY_ = valor de la coordenada Y. Ídem.
cota = .CentroZ_ Devuelve el valor más probable de la cota en las coordenadas (X,Y). SÓLO DISPONIBLE DESPUÉS DE REALIZAR EL DIBUJO.
.LadoCorto = Establece uno de los lados del paralepípedo de selección (10m. por defecto)
.LadoLargo = El otro lado (30m. por defecto)
.Avance = Distancia siguiente en la dirección del ratón. (10m. por defecto)
.PintaSeccion = Empieza a trabajar.
.Para = true/false establece la interrupción de la lectura
Con estos datos el aspecto es éste:
The new LIDAR OCX module contains the following properties and methods
. SeaDir "Diectorio reading" only sets the working directory. Will read all .las Content
. CentroX_ = X coordinate value Set file display center
. CentroY_ = Y coordinate value Ditto.
height =. CentroZ_ Returns the most probable value of the elevation at the coordinates (X, Y). AVAILABLE ONLY AFTER MAKING THE DRAWING.
. LadoCorto = Set one side of the parallelepiped selection (10m. default)
. LadoLargo = The other side (default 30m.)
. Avance = Distance next in the direction of the mouse. (10m. default)
. PintaSeccion = starts working.
. Para = true / false establishes interrupt reading
With these data, the issue is this:

Datos de partida:
.LadoCorto = 20
.LadoLargo = 14 -> Recuadro azul.
.Avance = 10 -> línea amarilla.
A partir de aquí podemos hacer peticiones al módulo OCX.
Uno de sus métodos es:
_DondePincha (ByVal Button as Integer, ByVal Shift as Integer, ByVal x as Single, ByVal y as Single, ByVal UTMx as Double, ByVal UTMy as Double, ByVal PROPx as Double, ByVal PROPy as Double)
Button: botón derecho/izquierdo
Shift: Pulsado al tiempo control/mayúsculas/nada
x,y : coordenadas relativas
UTMx, UTMy: coordenadas absolutas del puntero (ratón)
PROPx, PROPy: coordenadas del punto rojo (a la distancia definida en .Avance, en nuestro caso 10m.)
Dentro de esta subrutina se puede, por ejemplo, modificar el centro de forma sencilla de la siguiente manera:
.CentroX_ = UTMx ó PROPx
.CentroY_ = UTMy ó PROPy
.PintaSeccion
.GuardaRecuadroExterior "nombre del archivo de destino"
Guarda en coordenadas absolutas en un archivo ascii .xyz con el orden xyziRGB el conjunto del borde exterior.
Input data:
. LadoCorto = 20
. LadoLargo = 14 -> Blue Box.
. Avancet = 10 -> yellow line.
From here we can make queries to the module OCX.
One of his methods is:
_DondePincha (ByVal Button as Integer, ByVal Shift as Integer, ByVal x as Single, ByVal y as Single, ByVal UTMx as Double, ByVal UTMy as Double, ByVal PROPx as Double, ByVal PROPy as Double)
Button: Right / left
Shift: Pulsed time control / shift / no
x, y: coordinates relative
Utmx, UTMY: absolute coordinate of the pointer (mouse)
Propx, PROPy: red point coordinates (a defined distance. Avance 10m in our case.)
This subroutine can, for example, modifying the center simple way as follows:
. CentroX_ = utmx or propx
. CentroY_ = UTMY or PROPy
. PintaSeccion
. GuardaRecuadroExterior "destination filename"
Save in absolute coordinates in ascii file. Xyz with xyziRGB order the entire outer edge.
.GuardaRecuadroInterior "nombre del archivo de destino"
Idem pero relativo al trozo comprendido en el recuadro azul. En coordenadas absolutas.
. GuardaRecuadroInterior "destination filename"
Idem but on the piece within the blue box. In absolute coordinates.
.GuardaRecuadroInteriorRel "nombre del archivo de destino"
Idem pero relativo al trozo comprendido en el recuadro azul. En coordenadas relativas.
. GuardaRecuadroInteriorRel "destination filename"
Idem but on the piece within the blue box. In relative coordinates.
El fichero tiene esta forma:
The file is:
4.41710 6.98247 59.83 27 70 57 66
4.39831 6.95703 59.83 27 72 59 68
4.36560 6.93402 59.83 31 65 52 61
4.45072 6.96944 59.83 28 68 55 64
4.43193 6.94400 59.83 29 71 58 67
4.39921 6.92099 59.83 36 69 56 65
4.38043 6.89555 59.83 27 67 54 63
[...]
A partir de aquí seguir con las proyecciones, crear el fichero eje es lógicamente trabajoso, son muy grandes los ficheros pero es totalmente factible.
Es recomendable tener los grandes ficheros partidos en cuadraditos (véase apartadohttp://carreteras-laser-escaner.blogspot.com.es/p/dividir-en-cuadritos-un-archivo-las.html)
También conviene ver el apartado: http://carreteras-laser-escaner.blogspot.com.es/ 2012/ 12/ division en perfiles transversales.html
From here continue to projections, create the file is logically laborious axis, are very large files but it's totally doable.
It is advisable to have large files into small squares parties (see section http://carreteras-laser-escaner.blogspot.com.es/p/dividir-en-cuadritos-un-archivo-las.html)
It should also see: http://carreteras-laser-escaner.blogspot.com.es/ 2012/ 12/ division en perfiles transversales.html
Más datos. Si hacemos ,
cota = PGeneral.CentroZ_, tendremos en cota la cota más probable del punto central.
a = PGeneral.RinconX_, b = PGeneral.RinconY_,
obtendremos las parejas {(a(0),b(0))..(a(3),b(3))} coordenadas absolutas de lasesquinas de cuadrilátero interno.
MX = PGeneral.X_, MY = PGeneral.Y_, MZ = PGeneral.RinconZ_,
obtendremos las coordenadas de los puntos del recuadro exterior {(MX(0), MY(0), MZ(0))..(MX(n), MY(n), MZ(n))}
donde n = PGeneral.NumeroPuntos.
Otras matrices son Color=PGeneral.C_ donde Color(j) corresponderá al color del punto (MX(j), MY(j), MZ(j))
Otras matrices son Intensidad=PGeneral.I_ donde Intensidad(j) corresponderá la intensidad del punto (MX(j), MY(j), MZ(j))
Módulo descargable desde aquí
Con esta herramientas hemos creado el siguiente programa:
More details. If we do,
cota = PGeneral.CentroZ_, we will most likely bound the dimension of the center point.
a = PGeneral.RinconX_, b = PGeneral.RinconY_,
couples obtain {(a (0), b (0)) .. (a (3), b (3))} lasesquinas absolute coordinates of inner ring.
MX=PGeneral.X_, MX = MY = PGeneral.Y_, MZ = PGeneral.Z_,
obtain the coordinates of the points of the outer box {(MX (0), MY (0), MZ (0)) .. (MX (n), MY (n), MZ (n))}
where n = PGeneral.NumeroPuntos.
Other matrices are Color=PGeneral.C_ where Color = Color (j) corresponds to the color point (MX (j), MY (j), MZ (j))
Intensida=PGeneral.I_ where Intensidad = Intensity (j) correspond intensity point (MX (j), MY (j), MZ (j))
Module downloaded from here
With this tool we have created the following program:
Si bien algunos archivos LIDAR sobrepasan los 2 GB no se nos van a dar casos tan exagerados. Por tanto la solución cierra el problemas del tamaño.
My friend Miguel E. asked me to modify the code so that the North was always up (sorry for the error) and also do not stop to read a file to exceed 2GB. The second problem is the use case for the direct environment of Windows programming that limits the maximum integer value (type Long) as Int32. That is 2 ³ ¹ = 2.1471483.648 = 2GB. By changing the reading system using kernel direct dlls is possible is to use the following integer type Int64 that elevates the latter one byte readable to 2 ⁶ ³ = 183446.7442073.7091551.616. Following the sufigos available 181446.744TB or 18.446PB (petabyte) or 18EB (exabyte). If you're curious about how to make contact with us.
While some LIDAR files exceed 2GB not going to give us so exaggerated cases. The solution thus closes the size problems.
Una nueva versión:
A new version:
.SeaDir "Diectorio de lectura" Sólo establece el directorio de trabajo. Serán leídos todos los archivos .las contenidos
.CentroX_ = valor de la coordenada X. Establece en centro de visualización del archivo
.CentroY_ = valor de la coordenada Y. Ídem.
cota = .CentroZ_ Devuelve el valor más probable de la cota en las coordenadas (X,Y). SÓLO DISPONIBLE DESPUÉS DE REALIZAR EL DIBUJO.
.LadoCorto = Establece uno de los lados del paralepípedo de selección (10m. por defecto)
.LadoLargo = El otro lado (30m. por defecto)
.Avance = Distancia siguiente en la dirección del ratón. (10m. por defecto)
.PintaSeccion = Empieza a trabajar.
.Para = true/false establece la interrupción de la lectura
Con estos datos el aspecto es éste:
The new LIDAR OCX module contains the following properties and methods
. SeaDir "Diectorio reading" only sets the working directory. Will read all .las Content
. CentroX_ = X coordinate value Set file display center
. CentroY_ = Y coordinate value Ditto.
height =. CentroZ_ Returns the most probable value of the elevation at the coordinates (X, Y). AVAILABLE ONLY AFTER MAKING THE DRAWING.
. LadoCorto = Set one side of the parallelepiped selection (10m. default)
. LadoLargo = The other side (default 30m.)
. Avance = Distance next in the direction of the mouse. (10m. default)
. PintaSeccion = starts working.
. Para = true / false establishes interrupt reading
With these data, the issue is this:

Datos de partida:
.LadoCorto = 20
.LadoLargo = 14 -> Recuadro azul.
.Avance = 10 -> línea amarilla.
A partir de aquí podemos hacer peticiones al módulo OCX.
Uno de sus métodos es:
_DondePincha (ByVal Button as Integer, ByVal Shift as Integer, ByVal x as Single, ByVal y as Single, ByVal UTMx as Double, ByVal UTMy as Double, ByVal PROPx as Double, ByVal PROPy as Double)
Button: botón derecho/izquierdo
Shift: Pulsado al tiempo control/mayúsculas/nada
x,y : coordenadas relativas
UTMx, UTMy: coordenadas absolutas del puntero (ratón)
PROPx, PROPy: coordenadas del punto rojo (a la distancia definida en .Avance, en nuestro caso 10m.)
Dentro de esta subrutina se puede, por ejemplo, modificar el centro de forma sencilla de la siguiente manera:
.CentroX_ = UTMx ó PROPx
.CentroY_ = UTMy ó PROPy
.PintaSeccion
.GuardaRecuadroExterior "nombre del archivo de destino"
Guarda en coordenadas absolutas en un archivo ascii .xyz con el orden xyziRGB el conjunto del borde exterior.
Input data:
. LadoCorto = 20
. LadoLargo = 14 -> Blue Box.
. Avancet = 10 -> yellow line.
From here we can make queries to the module OCX.
One of his methods is:
_DondePincha (ByVal Button as Integer, ByVal Shift as Integer, ByVal x as Single, ByVal y as Single, ByVal UTMx as Double, ByVal UTMy as Double, ByVal PROPx as Double, ByVal PROPy as Double)
Button: Right / left
Shift: Pulsed time control / shift / no
x, y: coordinates relative
Utmx, UTMY: absolute coordinate of the pointer (mouse)
Propx, PROPy: red point coordinates (a defined distance. Avance 10m in our case.)
This subroutine can, for example, modifying the center simple way as follows:
. CentroX_ = utmx or propx
. CentroY_ = UTMY or PROPy
. PintaSeccion
. GuardaRecuadroExterior "destination filename"
Save in absolute coordinates in ascii file. Xyz with xyziRGB order the entire outer edge.
 |
| Visualización del extracto con FrugoViewer Viewing the extract with FrugoViewer |
.GuardaRecuadroInterior "nombre del archivo de destino"
Idem pero relativo al trozo comprendido en el recuadro azul. En coordenadas absolutas.
. GuardaRecuadroInterior "destination filename"
Idem but on the piece within the blue box. In absolute coordinates.
 |
| Visualización del extracto con FrugoViewer Viewing the extract with FrugoViewer |
.GuardaRecuadroInteriorRel "nombre del archivo de destino"
Idem pero relativo al trozo comprendido en el recuadro azul. En coordenadas relativas.
. GuardaRecuadroInteriorRel "destination filename"
Idem but on the piece within the blue box. In relative coordinates.
 |
| Visualización del extracto con FrugoViewer Viewing the extract with FrugoViewer |
The file is:
4.41710 6.98247 59.83 27 70 57 66
4.39831 6.95703 59.83 27 72 59 68
4.36560 6.93402 59.83 31 65 52 61
4.45072 6.96944 59.83 28 68 55 64
4.43193 6.94400 59.83 29 71 58 67
4.39921 6.92099 59.83 36 69 56 65
4.38043 6.89555 59.83 27 67 54 63
[...]
A partir de aquí seguir con las proyecciones, crear el fichero eje es lógicamente trabajoso, son muy grandes los ficheros pero es totalmente factible.
Es recomendable tener los grandes ficheros partidos en cuadraditos (véase apartadohttp://carreteras-laser-escaner.blogspot.com.es/p/dividir-en-cuadritos-un-archivo-las.html)
También conviene ver el apartado: http://carreteras-laser-escaner.blogspot.com.es/ 2012/ 12/ division en perfiles transversales.html
From here continue to projections, create the file is logically laborious axis, are very large files but it's totally doable.
It is advisable to have large files into small squares parties (see section http://carreteras-laser-escaner.blogspot.com.es/p/dividir-en-cuadritos-un-archivo-las.html)
It should also see: http://carreteras-laser-escaner.blogspot.com.es/ 2012/ 12/ division en perfiles transversales.html
 |
| Resultado final de la proyecciones. Final outcome of the projections. |
Más datos. Si hacemos ,
cota = PGeneral.CentroZ_, tendremos en cota la cota más probable del punto central.
a = PGeneral.RinconX_, b = PGeneral.RinconY_,
obtendremos las parejas {(a(0),b(0))..(a(3),b(3))} coordenadas absolutas de lasesquinas de cuadrilátero interno.
MX = PGeneral.X_, MY = PGeneral.Y_, MZ = PGeneral.RinconZ_,
obtendremos las coordenadas de los puntos del recuadro exterior {(MX(0), MY(0), MZ(0))..(MX(n), MY(n), MZ(n))}
donde n = PGeneral.NumeroPuntos.
Otras matrices son Color=PGeneral.C_ donde Color(j) corresponderá al color del punto (MX(j), MY(j), MZ(j))
Otras matrices son Intensidad=PGeneral.I_ donde Intensidad(j) corresponderá la intensidad del punto (MX(j), MY(j), MZ(j))
Con esta herramientas hemos creado el siguiente programa:
More details. If we do,
cota = PGeneral.CentroZ_, we will most likely bound the dimension of the center point.
a = PGeneral.RinconX_, b = PGeneral.RinconY_,
couples obtain {(a (0), b (0)) .. (a (3), b (3))} lasesquinas absolute coordinates of inner ring.
MX=PGeneral.X_, MX = MY = PGeneral.Y_, MZ = PGeneral.Z_,
obtain the coordinates of the points of the outer box {(MX (0), MY (0), MZ (0)) .. (MX (n), MY (n), MZ (n))}
where n = PGeneral.NumeroPuntos.
Other matrices are Color=PGeneral.C_ where Color = Color (j) corresponds to the color point (MX (j), MY (j), MZ (j))
Intensida=PGeneral.I_ where Intensidad = Intensity (j) correspond intensity point (MX (j), MY (j), MZ (j))
Module downloaded from here
With this tool we have created the following program:
 |
| Con un módulo PGeneral creamos un visión general de la carretera y nos posicionamos en un punto. With a module PGeneral create an overview of the road and positioned ourselves at one point. |
 |
| Después de posicionarnos pasamos al detalle en donde exportaremos la selección interna After we position ourselves to detail where internal selection will export |
 |
| Dicha selección interna podremos proyectarla en planta, frontal y laterales Such internal selection can project it on top, front and side |
 |
| Con nuestro otro programa ANPE podremos rescatar el fichero exportado y visualizarlo en 3D With our other program ANPE can rescue the exported file and view it in 3D |
No hay comentarios:
Publicar un comentario